- Military History
- Conflicts & Wars
- World War I
- Involved Nations WWI
- Arabia during World War I - The Arab Revolt - Part 3

Arabia during World War I - The Arab Revolt - Part 3 Outbreak of the Revolt, Capture of Coastal Towns, Railway Campaign & Fight for Aqaba
Although the Ottoman high command in Damascus was expecting trouble and had even begun moving reinforcements into the region, the outbreak of the revolt seems to have taken the local commanders by surprise.
Index of Content (Part 3)
The Arab Revolt
The Outbreak of the Arab Revolt, June 1916
At first light on the morning of 10 June 1916, the call for prayer rang out from the minaret of the mosque in Mecca. This moment had been chosen by the Hashemite leader, Sharif Hussein ibn Ali, as the starting point for the revolt against Ottoman power in the Hejaz. As the call came to its end, he took a rifle and walked to the window of his house firing a single shot. This was the signal for his supporters, who had come into the city in twos and threes the previous night, to go into action. A Hashemite flag fluttered to the flagpole above Sharif Hussein’s house. The Arab Revolt had begun.
A day of confused street fighting followed and, while the garrison at the governor’s offices surrendered the next day, the remaining garrison in both the barracks and the Jiyad fortress continued to defend themselves. With the benefit of both artillery and machine guns, they shut down the Arab attack. Stalemate ensued as the Ottoman commanders settled into a siege and awaited help from Medina. The Arabs, lacking artillery, could not press home attacks on the two main Turkish positions. It appeared the revolt might last only a few weeks, as it proved impossible to dislodge the Turks or force them to surrender. From the Turkish fortress, shells were fired into the town. This caused much damage within the holy city for which the Turks were later criticized throughout the Islamic world.

This situation lasted into July until Egyptian troops and a mountain battery arrived at Mecca. These had been rushed across the Red Sea by the Royal Navy and were immediately put into action against the Jiyad fortress. The fortress’s walls were breached, and the garrison surrendered. The Egyptian gunners then turned their attention on the Turkish barracks and their shells started a fire there. Lacking enough water to put the fire out, the last of the garrison surrendered on 9 July 1916. Over 300 of their number had died during the siege, Arab casualties were unknown. The surrender of the garrison had brought the Arab army five artillery pieces, as well as over 8,000 rifles and a large quantity of ammunition. The difficulties in Mecca prophesied later events in the revolt. In the months of warfare to come, Arab forces found frequently that they lacked the firepower to press home an attack.
At Ta’if, in the highlands to the south-east of Mecca, Sharif Hussein’s son, the Emir Abdullah, had arrived with a small force of tribesmen near the town around 5 June 1916. The governor of the Hejaz, Ghalib Pasha, was then in Ta’if and Abdullah informed him he was in the area to carry out a raid against another Arab tribe. During the days that followed, further Arab forces arrived to join Abdullah. By 10 June, he had a force of over 5,000 tribesmen. Having cut the telegraph link to Mecca, Abdullah and his tribesmen went into action on the evening of 10 June, attacking the north side of the town. The military commander at Ta’if, Ahmad Bey, had strengthened the town’s defenses in the weeks preceding the attack. Abdullah’s tribesmen, who again lacked support weapons, could not press home their attack. Over the following days, several other attacks failed, and the situation descended into a siege. Occasional sorties by the Ottoman troops failed to drive off the Arab tribesmen. In mid-July, help arrived for the Arabs as the same Egyptian battery that had shelled the fortress at Mecca. Yet even with their help, the siege was not ended until 22 September when the garrison surrendered.
The outbreak of the revolt at Medina was less auspicious. Arab forces under the emirs Ali and Feisal had gathered near the town on 5 June. Having sent a formal notice to the Turkish military commander, Fakhri Pasha, that the Arabs were breaking off relations with the Ottoman Government, they began military operations and carried out attacks on the railway in order to disrupt communications. On 8 June, they attacked the railway station at Muhit, to the north of Medina, but were driven off by the garrison. Worse was to follow as Fakhri Pasha had emerged from Medina with a force of at least two brigades. He fell upon the Arab rear and then pursued them southwards. Ali and Feisal split their forces, hoping to divide the pursuers. As he advanced southwards, Fakhri Pasha fortified and garrisoned towns along his route to facilitate future operations. At the outbreak of the revolt, Ottoman forces in Medina numbered around 12,000 men. As the city remained in Turkish hands, they could strengthen this force and begin a counterattack. There was no reason to believe at this time that the Arab Revolt would survive the year.
The Capture of the Coastal Towns and the Arrival of Aid from the Allies
The Arab leaders had recognized that the capture of coastal port towns on the Red Sea would be crucial for the survival of their revolt. As the initial attacks were occurring at Mecca, Ta’if and Medina, other Arab forces were advancing to seize ports on the Red Sea coast. The forces of Sharif Mushin Mansur forced the surrender of the Turkish garrison at Jiddah, aided by seaplane attacks from the Royal Navy carrier HMS Ben-My-Chree. In late July, both Yanbu and Rabegh fell into Arab hands. The initial force of Egyptian troops that facilitated the taking of Mecca and Ta’if had arrived at Jiddah in July. Also in July, the first contingent of 700 volunteers had arrived for the Arab Regular Army. Former POWs, and predominantly of Iraqi origin, they were commanded by Nuri as-Sa’id. They brought with them a battery of 4.5in. howitzers, four mountain guns, eight machine guns, explosives and 4,000 rifles.
The initial primary base was at the port of Jiddah, which was placed under the command of Colonel Cyril Wilson. With the help of a few officers, including Lieutenant (later Major) H. Garland, the town was fortified. Garland would later take part in a series of attacks against the railway. By October, the British and French had established military missions to the Arab Army under colonels Wilson and Brémond respectively and they had representatives in the coastal towns, while the French also had military personnel drawn from Muslim units in Mecca. The Arab Regular Army was also being reinforced and, now under the command of Ali al-Masri, it provided much-needed support to the Arab irregular armies. Contingents of the Regular Army had been sent into the field and had already joined the irregular forces of the emirs Feisal and Ali, hoping to impede Turkish countermoves. Despite these improvements to the Arab situation, the fall months of 1916 were difficult for the forces of the Arab Revolt. The Turkish forces under Fakhri Pasha had swelled to 12 battalions of infantry, plus various supporting units. He had continued to operate against Arab forces south of Medina and was determined that the Arab Revolt would end within the year.
It was in October 1916 that T.E. Lawrence joined the Arab Army in the field. He had been released by the Intelligence Department in Cairo and attached to the Arab Bureau. With Ronald Storrs, he was dispatched by ship to Jiddah to assess the situation in the Hejaz and to suggest further courses of action. An implicit part of his mission was to assess the various Hashemite leaders and determine which of these were most likely to prosecute the war effectively against the Turks. It is impossible in the space of this article to describe fully the political machinations that followed. But it must be pointed out that Lawrence, despite his youth and lack of field experience, quickly summed up the qualities of the various Arab leaders. He dismissed the emirs Ali and Abdullah for various reasons. Perhaps, in reality, this was because they were less prone to foreign manipulation. He fixed his attention on the Emir Feisal, whom he recognized as being a charismatic leader and as the leader who perhaps had the least to gain from the political dispensation as it then stood. On Lawrence’s recommendation, Feisal would receive increasing amounts of support from Britain, in terms of both money and military material. He would also be re-directed northwards to satisfy both his own kingly ambitions and British military purposes. Feisal was then encamped near Yanbu with around 9,000 men.
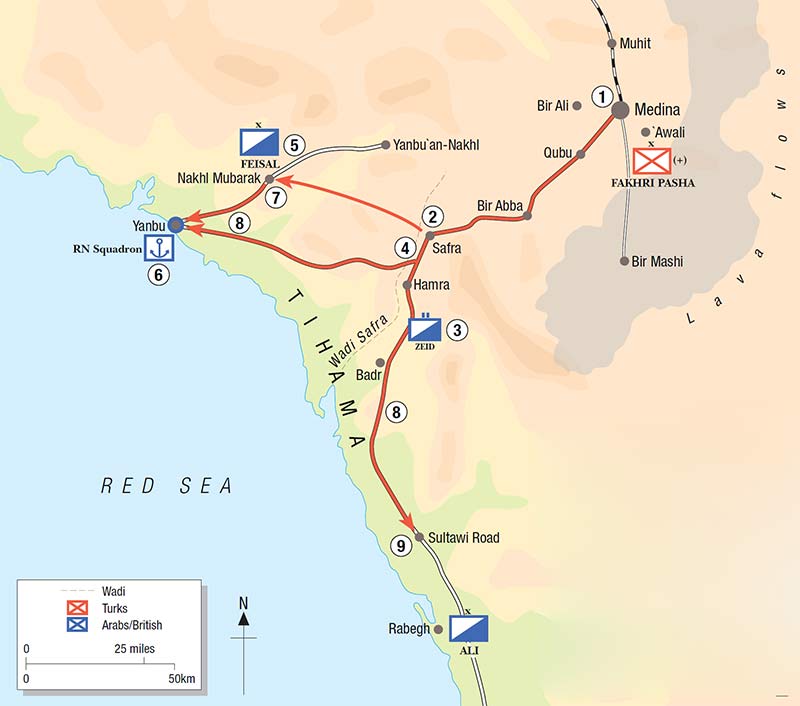
Lawrence returned to Cairo to report before setting out again for the Hejaz on 25 November. His arrival was timed to coincide with the most serious crisis yet faced by the Arab leaders. Having maintained contact with the Arab armies throughout October and November, Fakhri Pasha advanced out of Medina on 1 December 1916 with three full brigades intending to reinforce his army in the field and retaking Yanbu. He immediately outflanked the tribesmen of the Bani Salem, who were holding the Wadi Safra to the west of Medina. The Emir Zeid, Hussein’s youngest son, rushed to Hamra to oppose the Turkish advance, only to be swatted aside. Feisal moved to Nakhl Mubarak to the east of Yanbu, hoping to divert the major thrust of Fakhri Pasha’s advance, and, although his force was attacked, there seemed to be no way of deflecting the Turkish commander from his intention. Here Lawrence found Feisal during the night of 3/4 December, and they discussed their plans.
In the action that followed, the Arabs were pushed back from Nakhl Mubarak, Yanbu would be recaptured and Feisal’s army would be destroyed or scattered. At Yanbu itself, where the defense was under the command of Garland, some attempt was being made to put the town into order, but there were only 1,500 Arab troops available. It was five ships of the Royal Navy’s Red Sea Patrol that threw the balance back in the Arabs’ favor.
In the course of the entire campaign, the Royal Navy often played a crucial role not only by supplying the Arab armies but also by covering the port towns in moments of crisis. Here, five Royal Navy ships including HMS Dufferin and the M.31, a monitor capable of moving close inshore, had arrived to cover Yanbu with their guns and searchlights. The Royal Navy force also included the seaplane carrier HMS Raven, which dispatched seaplanes to attack the Turkish column. The failure of the Turkish force to press home an attack during the night of 11/12 December effectively ended their hopes of recapturing Yanbu. Lawrence later stated that it also ended their chances of regaining control in Arabia.
Intimidated by Royal Navy ships and RNAS planes, Fakhri Pasha then turned his intention southwards and he advanced within 50 km (30 miles) of Rabegh before this advance stalled. While the forces of the emirs Ali and Zeid seemed too weak to stop the Turkish advance, once again Fakhri Pasha’s force was subjected to an air attack, this time from a flight of RFC planes now operating from Yanbu. The Royal Navy also moved ships to cover Rabegh and thereafter, a series of further problems emerged for the Ottoman commander. He was facing logistical difficulties as his supply lines stretched back to Medina and were subject to attack from tribesmen.
In the last weeks of 1916, the Turks found it difficult to maintain the momentum of their advance and in early 1917, Fakhri Pasha revived news that a Turkish column under Ashraf Bey had been captured near the oasis of Khaybar. This Turkish force had been overrun by a force led by the Emir Abdullah and it was found that they were escorting over £20,000 in gold coin. He was informed that a large Arab force was marching on Wejh, one of the last Ottoman-held ports on the Red Sea, while RFC planes were flying raids on Medina. On 18 January 1917, the Turkish offensive was called off and Fakhri Pasha marched his army back to Medina.
This was not, however, the end of Turkish countermoves south of Medina. In March 1917, the Ottoman forces were joined by Ibn Rashid and his tribesmen and carried out a sweep to the west. There would also be further operations against the Arab armies later in the fall of 1917. Ultimately, perhaps in failing to re-take Yanbu in December 1916, the Turks had lost the initiative in the campaign. They would find themselves confined to Medina for the rest of the war. Equally, the armies of the emirs Ali and Abdullah would remain in this southern part of the Hejaz for the rest of the war as they countered the Ottoman forces. The Arab advance on Wejh signaled the beginning of a new phase of the campaign that would eventually lead the Arab Northern Army to Damascus.
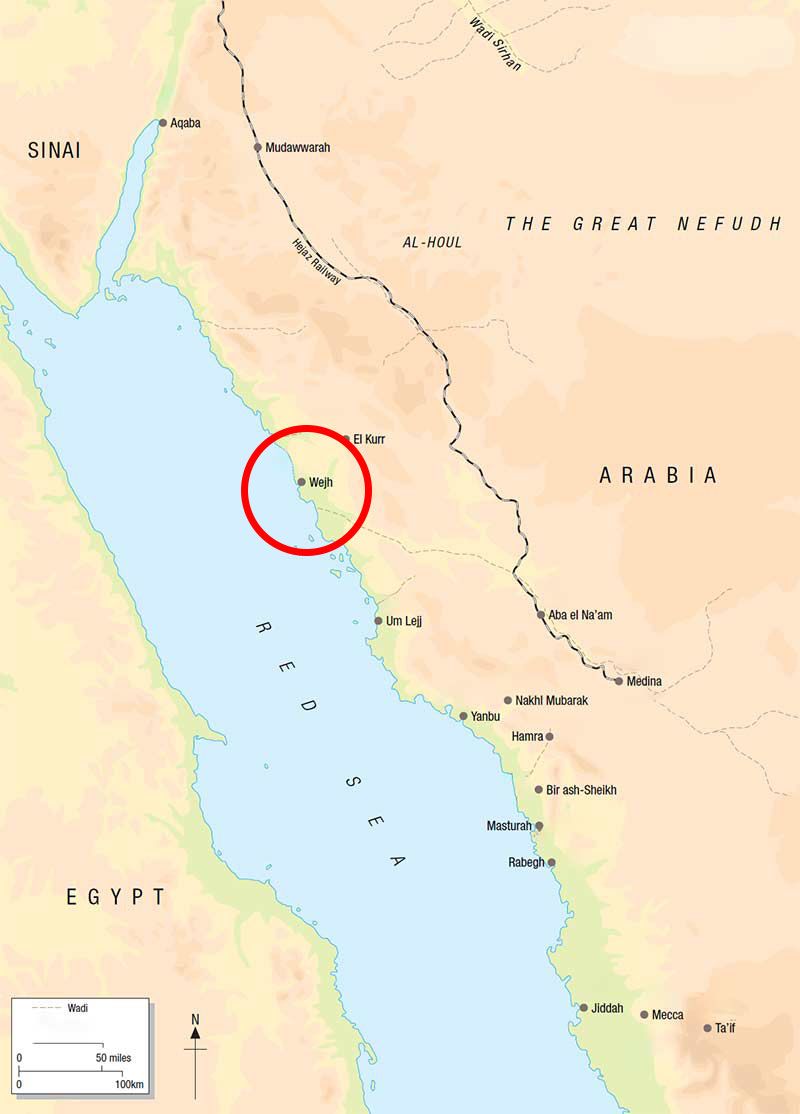
The Capture of Wejh, December 1916 - January 1917
In the middle of December 1916, the Emir Feisal moved his army northwards, away from Yanbu, in order to take the port of Wejh further up the coast. There were immediate military reasons for doing this. Wejh was one of the last major ports on the Red Sea coast, still in Ottoman hands, and the last anywhere near Mecca and the other towns in Arab possession. Moving a large Arab force northwards would also force the Turks to react and thus take pressure off the Arab forces at Yanbu, Rabegh, Mecca and Ta’if. It was this threat of Arab attacks that had caused Fakhri Pasha’s counteroffensive to stall. This Arab move northwards would also ultimately extend Fakhri Pasha’s right flank all the way to Damascus, which was 1,300 km (800 miles) away, and force the Turks to spread their troops thinly to protect the railway line.
The Emir Abdullah took his army to Wadi ’Ais and from there he could still cover Yanbu while being able to attack the railway. In the first days of the new year, Feisal led his army northwards from Nakhl Mubarak. His force included 1,200 tribesmen of the Agayl and as well members of the Juhayna, the Harb and the Billi. Further tribesmen joined the army as they traveled and soon the force was over 8,000 strong. It was the largest Arab army in living memory.
As Auda ibn Hamad, sheikh of the Rifa’a, commented, it was ‘not an army, but a world which is moving on Wejh’. In cooperation with the Royal Navy, it was arranged that Wejh would be taken by simultaneous assaults from seaward and landward. The Royal Navy would support a landing in the port of Wejh, which would be carried out by Arab tribesmen. Feisal and Lawrence would press home an attack from the landward side. On the morning of 23 January 1917, a small flotilla of Royal Navy ships moved close inshore to Wejh. Commanded by Admiral Wemyss, they included HMS Hardinge, HMS Fox and HMS Espiegle and carried around 600 Arab volunteers. This small Arab force was commanded by Major Charles Vickerey, Captain N. N. E. Bray, and sheikhs Amar and Salih from the Arab Army. The town was garrisoned by around 800 men of the Turkish 129th Infantry Battalion, supported by a camel corps of 500 Agayl.

Supported by naval gunfire and a naval landing party, the force attacked the town, fighting from street to street during the day. The promised attack by Feisal, Lawrence and their tribesmen from the landward side did not materialize. Sections of the town had still not fallen by sunset, but the next morning it was found that the Turkish commander had evacuated the rest of the town. Only a small party of Turkish soldiers remained in the mosque and they soon surrendered. Feisal and Lawrence and the Arab Army did not arrive until 25 January. While recriminations flowed freely in the aftermath of this attack, it had secured its goal and the port of Wejh became a base for the build-up of the Arab Northern Army. It also became the primary base for the next phase of the revolt, which saw a series of raids taking place against the Hejaz Railway.
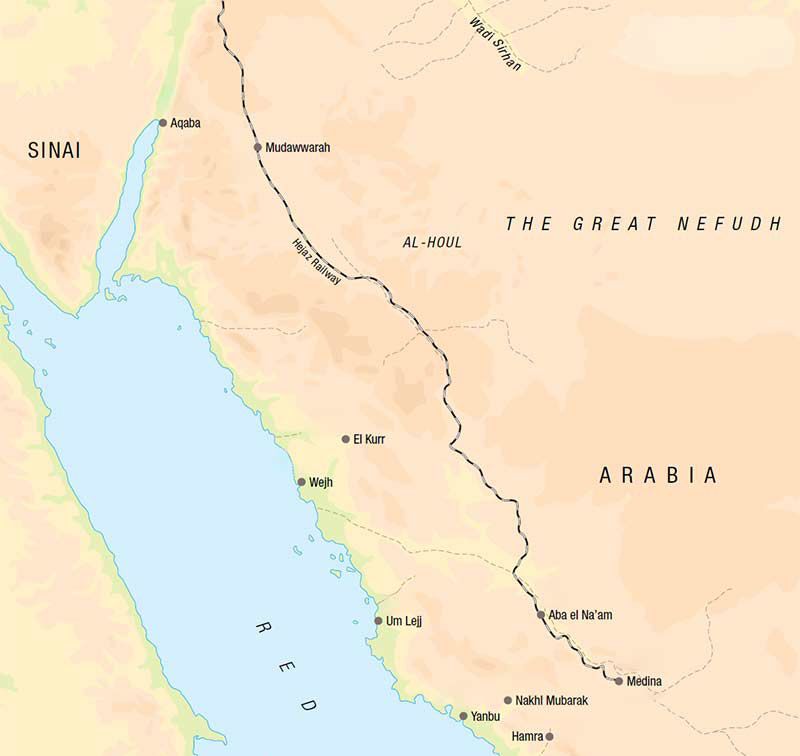
The Railway Campaign, 1917
The capture of Wejh facilitated Feisal and Lawrence’s plans to mount a campaign against the Hejaz Railway. The philosophy behind these railway attacks was quite simple. The attacks were to be serious enough to prevent the Turkish garrison at Medina from being re-supplied properly. This would prevent Fakhri Pasha from engaging in seriously offensive operations. It would also force the Turkish garrison at Medina and further north at Ma’an to dissipate their forces in defending the railway.
This general plan would develop further. By March 1917, General Murray was planning to advance across Sinai. Lawrence was then informed that it was imperative that the Medina garrison be prevented from evacuating the city. The forces of Fakhri Pasha, numbering over 12,000 troops, could not be allowed to reach Palestine, or even Ma’an. The ultimate philosophy behind the railway campaign, therefore, was to incapacitate, rather than destroy, the Turkish army in the Hejaz. The large garrison at Medina almost became captives as they lacked the capacity to mount a major offensive operation, while they could not evacuate along the railway in safety. In March 1917, Fakhri Pasha was ordered to leave Medina - orders that he successfully protested against.
It is impossible to cover this campaign in extensive detail here, but from early 1917 small parties of Arabs left Wejh to undertake attacks against the railway, commanded by officers such as Colonel Newcombe, Lieutenant (later Major) H. Garland and Lieutenant Hornby. Arab regular officers, such as Major al-Masri, also went on these railway raids. Their methods were simple, and they concentrated on finding unguarded sections of line and destroying them with explosives. Sometimes, if it was safe and time permitted, they would lever up sections of track by hand to conserve explosives. The parties were initially kept small to avoid detection and usually numbered two officers and perhaps a dozen tribesmen. These parties would later grow in size and in 1917 could vary between 40 to 200 men. During these larger raids, some men could demolish sections of line while others provided support.
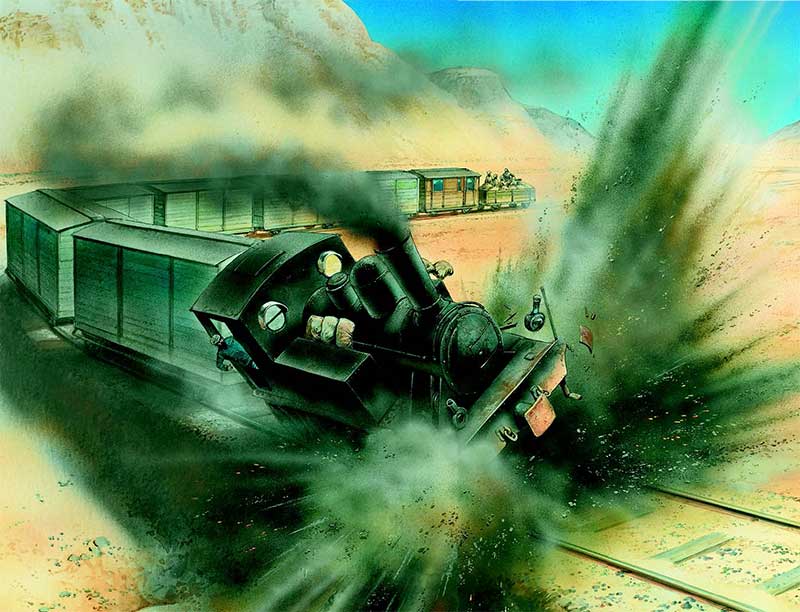
In February 1917, Lt. Garland mined a moving locomotive using a contact mine he had devised himself. This used the mechanism of an old Martini-Henry rifle as a trigger device. This type of contact mine came to be known as a ‘Garland mine’. The ambitions of the demolition officers then extended to cover attacks on Turkish locomotives and rolling stock. Soon Col. Joyce, who had been placed in charge of logistical matters at Wejh, found himself deluged with demands for explosives, detonators, exploder boxes and also lengths of electrical cable. He later commented that ‘all energies have to be concentrated on line smashing’.
Newcombe, Garland, Hornby and other officers developed methods for destroying the railway that reached exquisite proportions. While, initially, demolition parties had gone in for spectacular attacks that included trying to derail trains and setting off tremendous explosions on the line, they soon realized that they could employ other methods to perhaps greater effect. To create more disruption, by the summer of 1917, they focused their attention on damaging large sections of the line. They attacked curved sections at bends in the line, knowing that these rails would be harder to replace. They used ‘tulip mines’, which bent metal rails into fantastical tulip shapes, to damage long sections of the line. These methods forced Turkish repair parties to remove difficult, tangled sections of line before they could actually replace them, and this doubled the time and manpower spent to repair the line.
Lawrence, who had been attached as a permanent liaison officer with Feisal’s Army, also took part in these attacks. Instructed from Cairo to keep the Turkish Army in Medina, in March 1917, he traveled south to Wadi ’Ais to contact Abdullah and encourage him into greater efforts against the railway. It was during this expedition that he later claimed that he had executed one of his own party - a man known as ‘Hamed the Moor’, who had murdered one of the Agayl. Having delivered his message to Abdullah, Lawrence then set out on a raid of his own, attacking the line between Aba al-Na’am and Istabl Antar.
Lawrence and his party mined the track north and south of the station at Jabal Unsayl and cut the telegraph line. With Sharif Shakir, he took part in an attack on the railway station and one of his mines partly derailed an approaching train. Although driven off by Turkish fire, Lawrence’s raid had been a success. It would be the first of many raids.
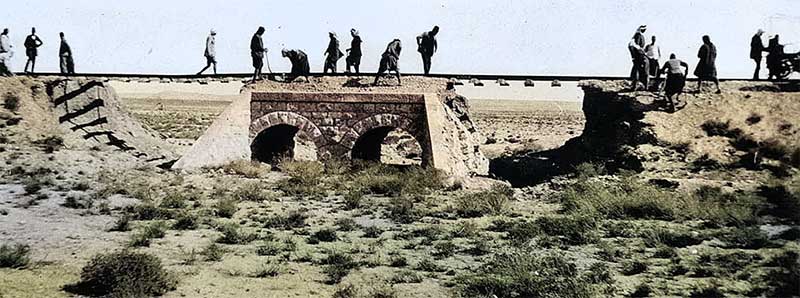
Lawrence continued his raids throughout the early summer of 1917, attacking both the line and station buildings at different locations. The other officers of the British mission were also keeping busy. The station at al ’Ula had been identified as a key target because of its plentiful supply of water. In June, Feisal, Newcombe, Joyce and Hornby took a party of Arab regular troops, tribesmen, Egyptian and Indian troops to attack the line both north and south of this important station. During the night of 6/7 July, Newcombe, Joyce and their party laid over 500 charges on railway sleepers to the south of al ’Ula and then detonated them at 2am. Hornby laid a further 300 charges to the north of al ’Ula.
Similar attacks continued over the next few nights, and on 11 July, RFC planes arrived to bomb al ’Ula by day. This was just one of many big raids, but it shows how the line could be cut and then kept closed for several days. For those involved, it was a deeply pleasing task. Colonel Joyce later wrote, “The noise of the dynamite going was something grand and it is always satisfactory finding one is breaking things”. In the months that followed, the demolition parties damaged stations, water towers and especially bridges. Joyce later recalled how he and Lawrence demolished either end of a stone bridge but left the center section tottering on the brink of collapse - delighted knowing that the Turks would have to engage in a dangerous demolition before replacing the whole bridge.
Such activity was not confined to the Arab Northern Army. In February 1917, at the same time that Newcombe, Garland and Hornby were beginning their attacks, the French mission was also organizing attacks on the line north of Medina. Capitaine Raho, formerly of the 2e Régiment de Spahis Algérien, carried out the first such attack when he set out in February with a small party of Bedu to mine the line. Further attacks were undertaken and Raho had increased the size of his force by August 1917 to 40 French troops and around 200 Bedu. In August he embarked on a major raid, attacking the line north of the station at Mudurij. Despite being under fire from the Turkish garrison, Raho and his men calmly went about their business of mining the line and destroyed five kilometers (three miles) of track and four bridges. He returned to the Emir Abdullah’s camp at Abu Markha on 30 August, having covered over 340 km (211 miles) in nine days and losing no men. For this action, Raho was promoted to be an officer of the Légion d’honneur and was also awarded the Military Cross by the British Government.
The railway raids played a vital part in the revolt in 1917 and were an enormous boost to Arab and Allied morale. Such attacks became a feature of the campaign throughout 1917 and 1918. Lawrence had begun the war as a military amateur, but he realized that a new fighting doctrine was emerging out of the Arab Revolt. He later summed up the philosophy behind the raids: ‘Most wars were wars of contact, both forces striving into touch to avoid tactical surprise. Ours should be a war of detachment. We were to contain the enemy by the silent threat of a vast unknown desert, not disclosing ourselves till we attacked. The attack might be nominal, not directed against him, but against his stuff; so, it would not seek either his strength or his weakness, but his most accessible material.’
Aqaba, July 1917
While these raids were being carried out, the Arab Northern Army remained based at Wejh. During this period, the composition of the irregular contingent of the army changed. Some of the more southern tribesmen began to leave and head southwards to return to their homelands. The men of the Juhayna for instance, left for their homeland in the Wadi Yanbu. Tribesmen arrived from the north, men whose homelands were in Syria or the Syrian marches. They included tribesmen from the Howeitat, the Shararat, the Bani ’Atiya and the Rwalla.
These northern tribesmen urged Feisal to move the revolt northwards through Palestine and onward to Syria. Their leaders included Auda abu Tayi, whose Howeitat had their homeland to the east of Ma’an. They also included the Syrians Nasib al-Bakri and Zaki Drubi, who promised a widespread revolt in their homeland if the Arab Northern Army took the campaign there. They were preaching to the converted. Feisal had long been convinced that the Hejaz could not survive as an independent state without some connection with the more fertile regions of Palestine and Syria. From a personal point of view, he knew he must also look towards Palestine and Syria to satisfy his kingly ambitions. The Arab leaders had known the details of the Sykes-Picot Agreement since May 1917. It was now rumored that over 60,000 French troops were going to be landed in Syria. Feisal knew he must act if he was to have any hope of securing any chance of ruling these lands. If an Arab army owned Palestine and Syria, then surely they would have considerable moral and political leverage in any post-war conference.
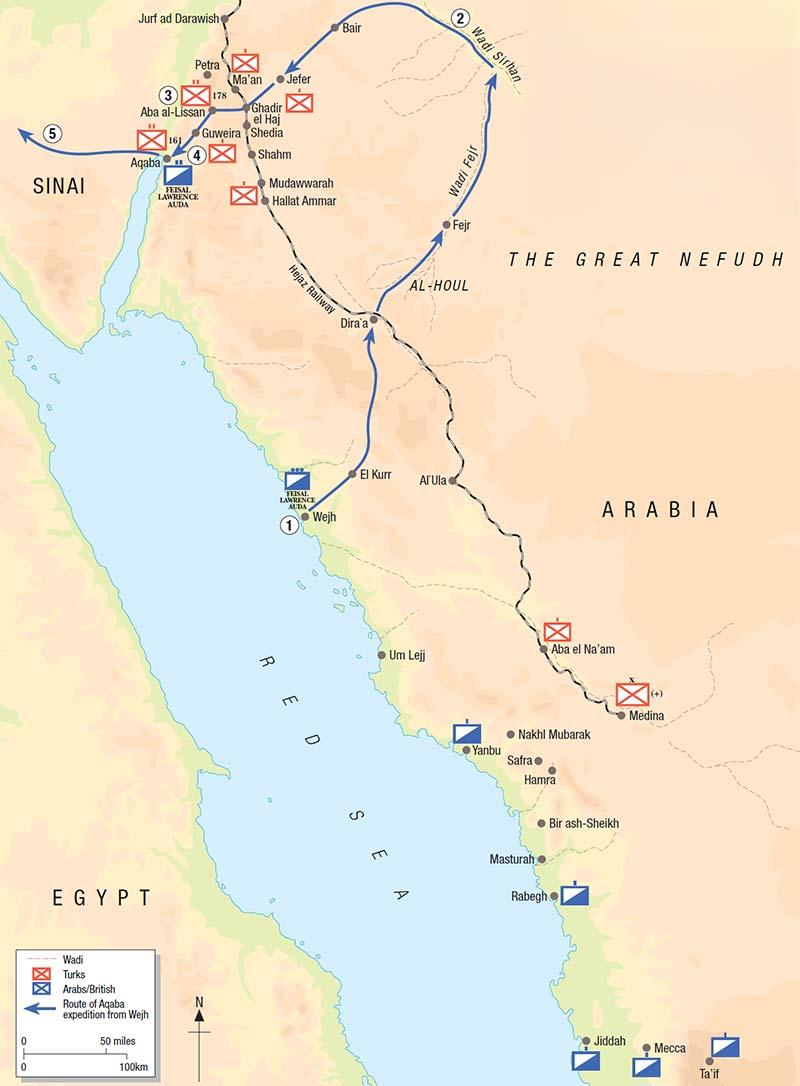
While Lawrence felt that a Syrian uprising at this time would be premature, he also recognized the need to regain the initiative in the campaign. He opposed the idea of French control of Syria and had also been shocked at the revelations of the Sykes-Picot Agreement. His attention focused on the port town of Aqaba, the last Red Sea port in Ottoman control. If it could be seized for Feisal’s Army, it would change the whole direction of the campaign and its location would facilitate operations into Palestine and Syria. If the Arab Northern Army was based there, it would also be nearer to the main Allied army and could assist in future operations.
The Royal Navy had shelled Aqaba from the seaward side, but the coastal defenses were felt to be too strong to allow a landing. Lawrence now came up with the plan of taking it from the landward side. Auda and also the Syrian leaders supported him in this and he convinced Feisal of the viability of the plan. It is now obvious that he was disingenuous with his fellow British officers at Wejh, including Col. Joyce, who was in command of Operation Hedgehog, as the British mission to the Arab Northern Army had been christened. As Lawrence presented it, he was planning a long-range raid to the vicinity of Ma’an. It was to be timed to coincide with a major raid that was being carried out by Col. Newcombe toward al ’Ula.
On 9 May 1917, he left Wejh with a small party. He was accompanied by some of the best leaders of the Arab Revolt, all of whom had displayed highly developed tactical abilities in the past. Sharif Nasir was in tactical command and the party also included Auda and Za’al Abu Tayi, Nasib al-Bakri, Zaki Drubi and Mohammed adh-Dhaylan. As the Arab tribesmen would not fight outside of their tribal homelands, they took only 17 Agayl fighters with them, who were commanded by their chief Ibn Dgaythir. They carried over £20,000 in gold coin with them, with which they intended to recruit tribesmen, predominantly from the Howeitat, near Aqaba.
In his biography of T. E. Lawrence, Michael Asher has described the Aqaba expedition as ‘one of the most daring raids ever attempted in the annals of war’. They planned to approach Aqaba by carrying out a vast sweep to the north-east. This would cause covering over 1,000 km (620 miles)of the worst terrain in Arabia, including a section of desert known as ‘al-Houl’, ‘the Terror’. The small party would travel down the Wadi Sirhan, a major corridor of communication, and there they hoped to recruit Howeitat tribesmen. They would then descend south-westwards down the Wadi Ithm to attack Aqaba from the land. As they drew further northwards, Lawrence planned to launch attacks on the railway, to distract the Turks from the mission’s true aim. This was to be an expedition of epic proportions.
Lawrence himself later wrote of the harshness of the desert. ‘Bedouin ways were hard even for those brought up to them, and for strangers terrible: a death in life.’ The reality of these words was brought home to all the parties as, for weeks, they trekked through some of the worst desert terrain in Arabia. On crossing the railway line on 19 May, they dynamited a section of it and also cut the telegraph lines. On one occasion, Lawrence returned alone to look for one of his servants, Gasim, who had fallen from his camel and been left behind. It was an incredibly selfless act for any man to undertake in such a hostile and dangerous location.
Having endured hunger, thirst and braved raiding parties, the party encountered friendly tribesmen around the end of May. Some of these were recruited for the Aqaba attack. Leaving the primary force in Wadi Sirhan, Lawrence struck off to head even further northwards. In a round trip of over 800 km (500 miles), he headed to the outskirts of Damascus, where he met with Arab leaders and implored them not to rise too soon against their Ottoman overlords. En route, he demolished a bridge near Ras Baalbek with the help of Metawila tribesmen. This attack led to the fear of a general uprising among the Metawila, which led the Turks to move six battalions out of the front line. Lawrence had also carried out a major reconnaissance of the region and this would facilitate the later Allied advance into Palestine and Syria. He arrived back at Nabk in the Wadi Sirhan on 17 June.
In his absence, the Arab leaders had recruited the force that would ultimately take Aqaba. It comprised over 500 men of the Howeitat, 150 Rwalla and Shararat tribesmen, and 35 men of the Kawakiba. They set out on their last march towards Aqaba, finding that the Turks had destroyed many of the wells along their route. On 30 June, a detached party of Howeitat from the primary force took the Ottoman fort Fuweilah, killing members of the garrison almost to a man in retaliation for a Turkish massacre of some of the local population. This fort was retaken by a battalion from the Turkish 178th Regiment, which had arrived from Ma’an to support the local garrisons. While a series of attacks were carried out against the railway, news reached Lawrence and the Arab leaders that this Turkish battalion was encamped around the well at Aba al-Lissan. It was the last major Turkish unit between the Arab force and Aqaba.
As the morning of 2 July dawned, Lawrence and the Arab tribesmen were positioned in the hills overlooking Aba al-Lissan and the Turkish battalion encamped there. The attack began with a prolonged period of inconclusive sniping and skirmishing. As the day grew hotter, the attack stalled and by afternoon, many of the tribesmen were shading from the sun, as was Lawrence himself. It was an exchange between Auda abu Tayi that regained the momentum of the attack. Lawrence’s calculated insult that the tribesmen ‘shoot a lot and hit a little’ incited Auda’s anger and spurred him to organize a charge of 50 tribesmen. These riders swept through the Turkish force and ended their resistance. Lawrence and Nasir then led 400 camel-riders in a last attack to cut off the enemy’s pursuit, in which Lawrence shot his own camel in the head on account of his excitement. For the cost of two Arab tribesmen who were killed, the Turkish battalion had been destroyed, suffering around 300 fatal casualties while the commanding officer and around 160 men were taken prisoner. The Arab force had also captured a mountain gun.
In the days that followed, the outlying Turkish garrisons at Guweira, Kathira and Hadra surrendered; one of the captured Turkish officers sending letters into the besieged troops telling them they would be treated fairly. As the Arab force approached Aqaba, they found further outposts abandoned. On the evening of 5 July, they reached the final Turkish post at Khadra and there was some sniping that evening and the next morning. There were also attempts to secure the surrender of the garrison. By this time, the Arab force had swelled to over 1,000 men as further tribesmen from the Howeitat and the Haywat had joined them. The Turkish commander at Khadra, realizing that no support could make it to him from Ma’an, agreed to surrender on the morning of 6 July. By chance, a Royal Navy gunboat, the Slieve Foy, had arrived off the port and had subjected it to further shelling. When Lawrence took the surrender of the Turkish troops at Khadra on 6 July, the tribesmen then dashed into Aqaba to find that the rest of the garrison had abandoned the town.
The last assault took place without a shot being fired. It was perhaps one of the greatest coups of the war. An Arab irregular force had not only defeated a regular Turkish battalion at Aba al-Lissan but had taken a major port on the Red Sea. The seizure of Aqaba also changed the orientation of the Arab Revolt totally and made operations into Palestine a serious possibility. Lawrence had to get this information to Cairo as soon as possible and set out on 7 July to cross Sinai to get to Suez and from there to GHQ in Cairo. He later claimed to have crossed the desert in 49 hours, which has since been impossible. However, when he reached Cairo on 10 July, he found that a new GOC had been appointed to the Egyptian Expeditionary Force. General Murray’s failure in two attacks on Gaza had led to his removal. His replacement by General Sir Edmund Allenby coincided with the Arab capture of Aqaba.
Still dressed in Arab robes, Lawrence was granted an interview with Allenby and informed him of Arab plans to rebel in Palestine and Syria. While Allenby’s real impression of Lawrence is sometimes hard to gauge, it seems apparent that he immediately recognized the strategic advantages he now possessed because of the Arab seizure of Aqaba. He promised to send whatever help he could. This meeting was as crucial for the future of the revolt as the capture of the port had been.
Read the previous part:

Arabia during World War I - The Arab Revolt - Part 2
Read the next part:
Arabia during World War I - The Arab Revolt - Part 4
- {{#owner}}
- {{#url}} {{#avatarSrc}}
{{name}} {{/url}} {{^url}} {{#avatar}} {{& avatar}} {{/avatar}} {{name}} {{/url}} - {{/owner}} {{#created}}
- {{created}} {{/created}}

")
")
")
 – German Order Police (1936-1942)")
")
")
")
")
")
")
")
")
")
")
")

")

")
")